🧠 Concept
AE-ComfyUI-Panels adds custom ScriptUI panels to Adobe After Effects that talk directly to ComfyUI. You can send prompts or selected layers from AE to your ComfyUI workflows, generate new images, and automatically import the results back into your composition — all without leaving After Effects.
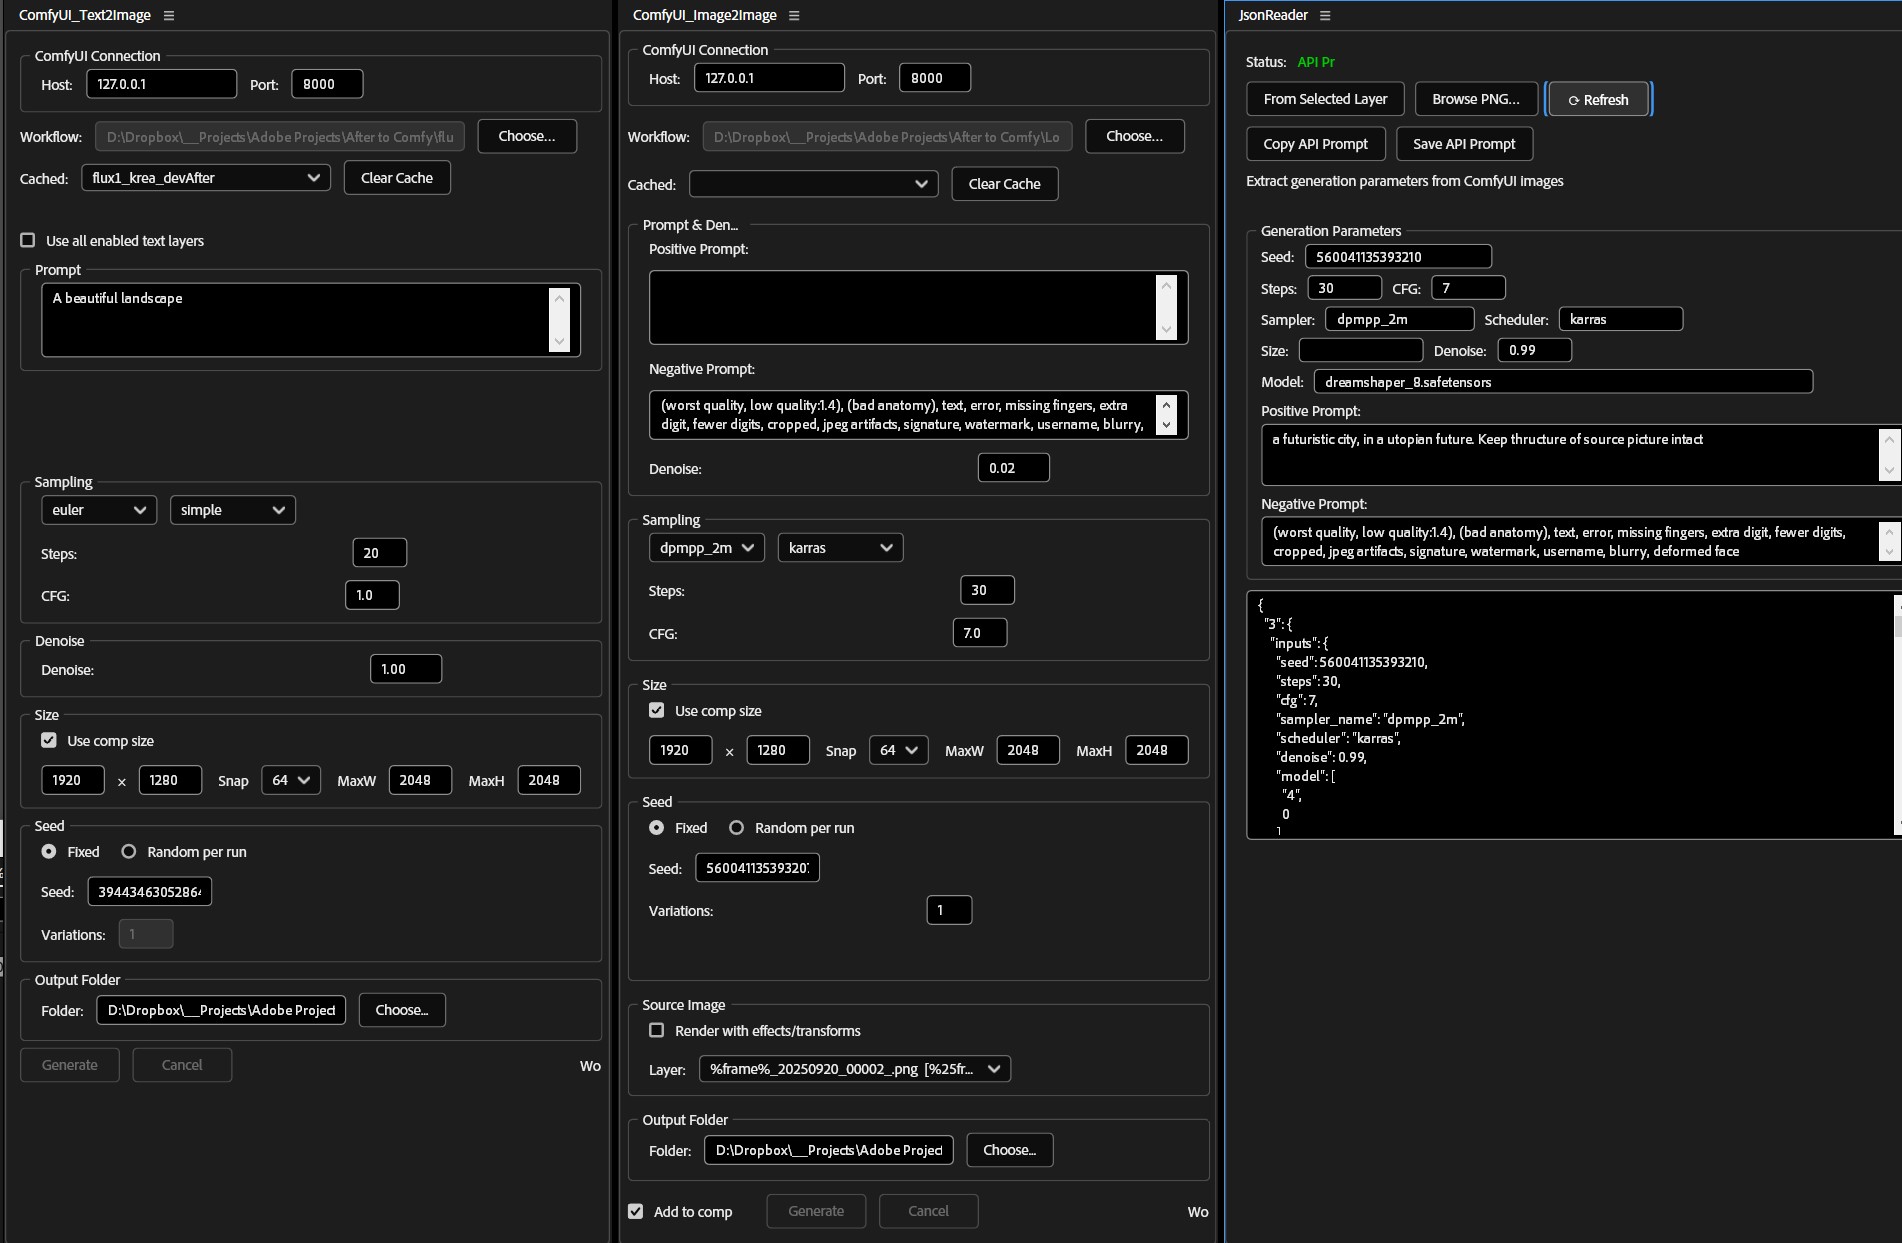
🎨 Panels
☁️ Google Gemini (Nano Banana)
- Generate images via Google Gemini (Nano Banana / Nano Banana Pro) through a local ComfyUI instance — no local GPU required
- 4 model variants: Nano Banana and Nano Banana Pro, each available as a ComfyUI-credits node or a Google-API-key PromptModel node
- Text-to-Image and Image-to-Image — mode auto-detected from active reference slots
- Up to 14 reference image slots — assign specific layers or use dynamic Top/Lowest layer tracking
- FX rendering — render a reference slot through AE effects before uploading; output template selectable in Settings → FX Template
- Composition-aware planner — auto-segments the work area by text + image layer transitions and generates one batch per unique segment
- Cost confirmation dialog — review all planned jobs and estimated credit cost before submitting
- Per-composition memory — model, slots, prompt, and settings saved and restored per comp
- Results imported and placed in the timeline at the correct in/out range, scaled to fit the comp
📝 Text-to-Image (Open Source)
- Generate AI images from a typed prompt or automatically from every enabled text layer in the active composition
- Fixed, Random, or Increment seed modes — generate multiple variations per prompt in one click
- Full parameter control: resolution, steps, CFG, sampler, scheduler, denoise, and seed
- Positive and negative prompt support (auto-detected from the workflow)
- Sampler and scheduler lists loaded live from your ComfyUI install via API introspection
- Workflow caching — previously loaded workflows open instantly with automatic cache invalidation
- Generated images are automatically imported into your AE project, sized and timed to the active composition
- Tested with Flux.1, Flux.2, and Qwen Illustration LoRA workflows
🖼️ Image-to-Image Panel (Work in progress)
- Send selected layers to ComfyUI for AI-powered modifications
- Adjust denoise strength for controlling variation intensity
- Generate multiple variations with seed control and denoise increments
- Option to render with effects/transforms or use raw source files
- Automatic upload and processing via ComfyUI's /upload/image API
📊 JSON Metadata Reader
- Extracts seed, steps, CFG, sampler, scheduler, size, denoise, model, and prompts from PNG metadata
- Supports standard SD, Flux.1, Flux.2, and Qwen workflows
- Read from a selected footage layer in the timeline or browse any PNG on disk
- Copy or save the full API-format prompt JSON for direct reuse with ComfyUI
- Auto-refreshes when you select a different layer
🔧 Additional Features
- Works with local or network ComfyUI setups
- Pure ExtendScript — no Python, no plugins, no external dependencies
- Persistent settings: host, port, workflow, and output folder saved between sessions
- MIT-licensed, free for personal and commercial use
⚙️ Installation
Step 1: Download the panel(s)
- Download the desired panel(s) from the latest release —
ComfyUI_Gemini.jsx,ComfyUI_Text2Image_v1.0.0.zip, and/orComfyUI_JsonReader_v1.0.0.zip - Extract any zip files and locate the
.jsxfile inside
Step 2: Install into After Effects
- In After Effects, go to File → Scripts → Install ScriptUI Panel...
- Select the
.jsxfile and click Open - Restart After Effects
- Open the panel via Window → ComfyUI_Gemini.jsx, Window → ComfyUI_Text2Image.jsx, or Window → ComfyUI_JsonReader.jsx
Note: Enable script access if prompted — Edit → Preferences → Scripting & Expressions → Allow Scripts To Write Files And Access Network
⬇️ Download Latest Release 💻 View Source on GitHub▶️ Usage
CloudGen Panel (Google Gemini)
- Start ComfyUI and open the panel via Window → ComfyUI_Gemini.jsx
- Set host/port and enter your API key — ComfyOrg Key for ComfyUI-variant models, Google Key for PromptModel variants
- Choose a Gemini model, set your prompt source, and optionally add reference image slots
- Set aspect ratio, resolution, and number of variations, then click Generate
- Review the cost confirmation dialog and confirm — results are downloaded and imported automatically
Text-to-Image Panel
- Start ComfyUI and open the Text2Image panel in AE via Window → ComfyUI_Text2Image.jsx
- Set host/port, then click Choose... to load your ComfyUI API workflow JSON
- Samplers, schedulers, and parameter ranges are loaded automatically from your ComfyUI install
- Enter your prompt, adjust settings, and click Generate
- The generated image is imported into your project and added to the active composition
- Enable Use all enabled text layers to batch-generate one image per text layer in the comp
Image-to-Image Panel
- Select an image layer in your composition
- Open the Image2Image panel via Window → ComfyUI_Image2Image.jsx
- Adjust denoise strength and other settings
- Generated variations appear as new footage items in your AE project
JSON Metadata Reader
- Use the JsonReader tools to inspect ComfyUI’s JSON output
- Select a ComfyUI-generated PNG layer in your timeline, then click From Selected Layer
- All detected generation parameters are displayed immediately
- Use Copy API Prompt to copy the full JSON for reuse in ComfyUI
🧩 ComfyUI Setup
AE-ComfyUI-Panels expects a running ComfyUI server. Configure your panel’s API URL to point to your ComfyUI instance and load a workflow that accepts either a text prompt or an input image (depending on which panel you use).
- Start ComfyUI with the desired model/checkpoint loaded
- Ensure your workflow exposes the proper API nodes for Text2Image / Image2Image
- Optionally store outputs and JSON metadata where AE can read them